
An Intern’s Account
Michael Zahnweh
The following essay was written by Michael Zahnweh, a student intern (23.07-07.09.2019) of the “Materiality of Musical Instruments” group at the Deutsches Museum. He details his apprenticeship with the resident organ builder Walter Chinaglia, which resulted in the construction of the rollerboard for Chinaglia’s work-in-progress.
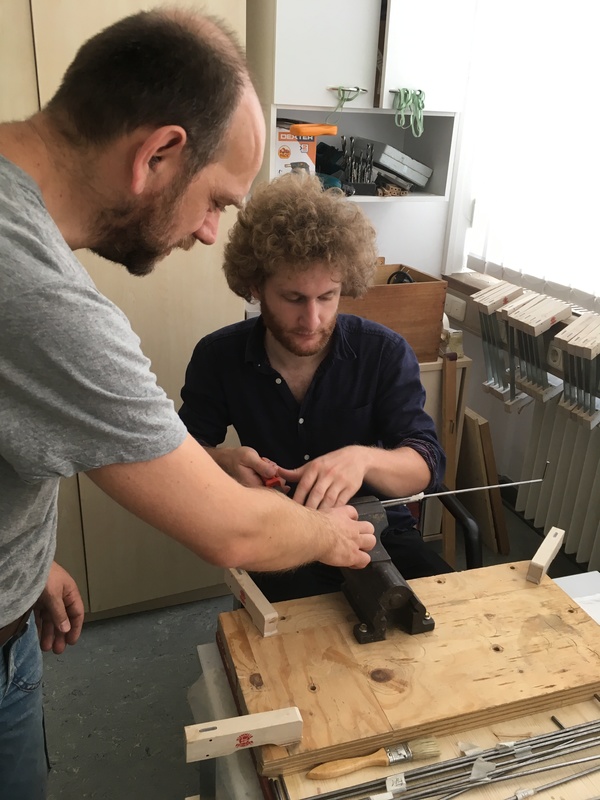
Walter Chinaglia and Michael Zahnweh bending rods for the rollers. (Attribution) Photo: Deutsches Museum, L. Chisholm CC BY-SA 4.0
During my internship in the Research Institute of the Deutsches Museum I had the chance to meet the organ builder Walter Chinaglia, who had been invited as a Visiting Fellow of the “Materiality of Musical Instruments” research group. As I am neither an organist nor an instrument maker, but rather a musicology student, I expected that I would assist him a little bit with his work and help him document the process for his upcoming talk.
Instead Walter gave me the opportunity to build the organ’s rollerboard (or catenacciatura, as it is called in Italian) largely on my own, following his instructions. The surprising thing for me was that he told me I would be able to do this without taking a single measurement, in the traditional sense of absolute units, but instead by working directly on the board itself by using a tool he had prepared that simply provided proportions instead of measurements. This is also how he constructed other parts of the organ and laid out the plans for it in the first place.
What is a rollerboard’s function and how is it constructed? Regarding the construction the correct answer certainly would be: it depends. Keep in mind that this organ is a project whose main historical model is the organo di legno in the Silberne Kapelle in Innsbruck which dates back to roughly 1580. A modern mechanism would be more elaborate and possibly a bit quieter, but also considerably more complex and could not be constructed without taking measurements. Still the function of a modern and a historical rollerboard remain basically the same: when you press a key on an organ you open a valve that allows air coming from a bellows to stream into a channel of the windchest where different pipes (all corresponding to the same note) are lined up and make a sound when the air hits them. You may switch some of those pipes on or off individually, which results in the so-called "registration".
The rollerboard acts as a connecting device between the keyboard and the windchest-valves. It comprises a set of rods, called rollers, each one dedicated to a single key on the keyboard. The layout and size of the keyboard is more or less fixed, but the layout of the pipes, of course, cannot be compressed to fit in the same space as the keyboard, since the pipes are simply too wide. As the valves cannot be directly attached to the keys due to this space problem, the organ requires a rollerboard to distribute the mechanical force of the keys to their corresponding valves. Furthermore, the layout of the valves itself also follows different criteria. For instance in this particular case, due to the meantone temperament, major thirds are arranged on the same side of the windchest whenever possible. For example, for a given note E, the two neighbouring major thirds above and below are C and G# and therefore the channels for these notes are next to each other in the windchest. So, the layout of the pipes of the windchest determines the position of one end of the rollers, and the layout of the keys determines the position of the other end of each roller. This pattern should enable the rods to fit in a small space while on the other hand they should not interfere with each other, which requires a certain amount of precision.
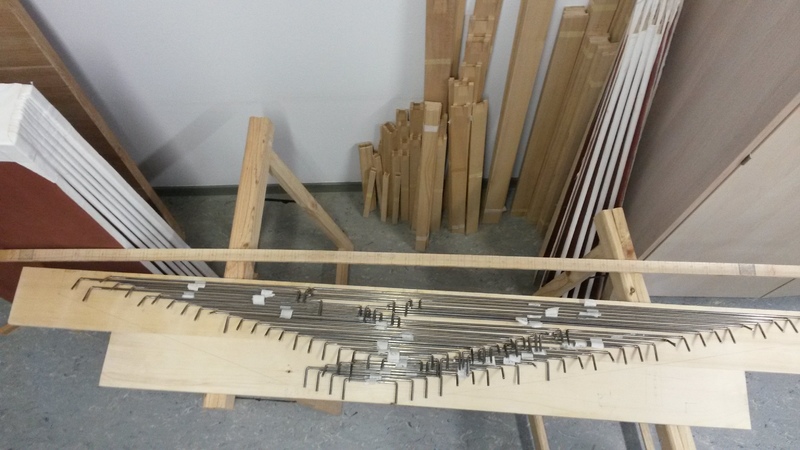
The finished rollerboard. (Attribution) Photo: Deutsches Museum, M. Zahnweh CC BY-SA 4.0
Here, you can see the finished rollerboard. On the keyboard's side, each vertical space can only be taken by one end of one rod, so that none of the wires connecting the keys with the ends of the rods interfere with each other. The same is true for the other ends of the rods. From there, the wires go upwards to the valve-side of the board, and each of those can also only take one vertical space, though being spread out more widely. Instead, almost every horizontal space on the wooden board is occupied by two rods, one extending to a valve on the left and one to a valve on the right side.
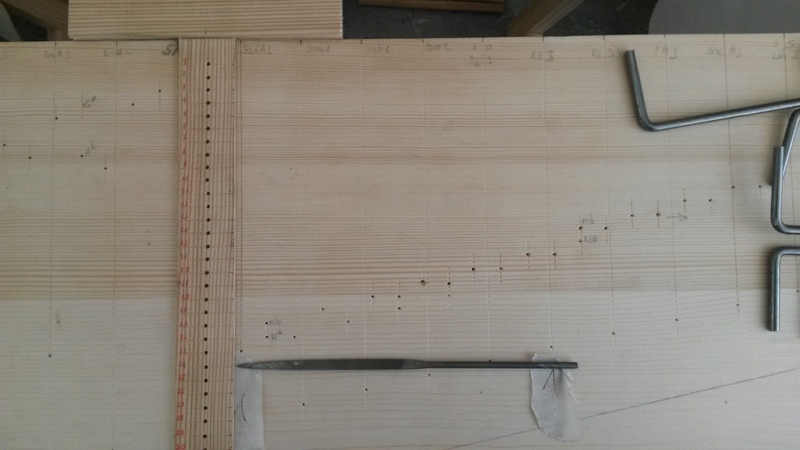
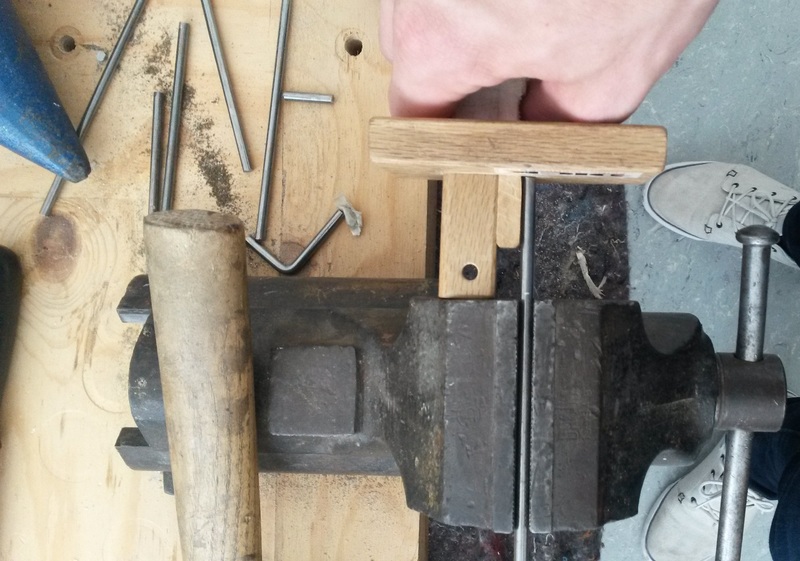
Jig for the preparation of the metal rods of the rollerboard. (Attribution) Photo: Deutsches Museum, M. Zahnweh CC BY-SA 4.0
In construction, each rod has to be bent, filed, flattened, and attached to the board with small wire-rings that allow it to move. First of all, you have to find the position in terms of the horizontal and vertical alignment of the rod on the wooden board. To do so?, a tool, prepared by Walter, was used that has consistently spaced indicators on it (see accompanying image). In this case you see the starting and ending position, indicated by the two arrows, for a rod that has not been made yet. The file is just there to help indicate the straight line. As you can see, both of these indicators coincide with “distance” number 24 on the tool. If you follow the line that starts on the right marker, you see that it ends up on the windchest-channel labelled “re 3” (after the Italian system of naming notes – do, re, mi, fa, etc.), therefore the D 3 . Note that there will be another rod on the horizontal axis indicated by number 24 that goes to a valve on the left instead, therefore sharing the same horizontal space but different vertical spaces (hence different keys).
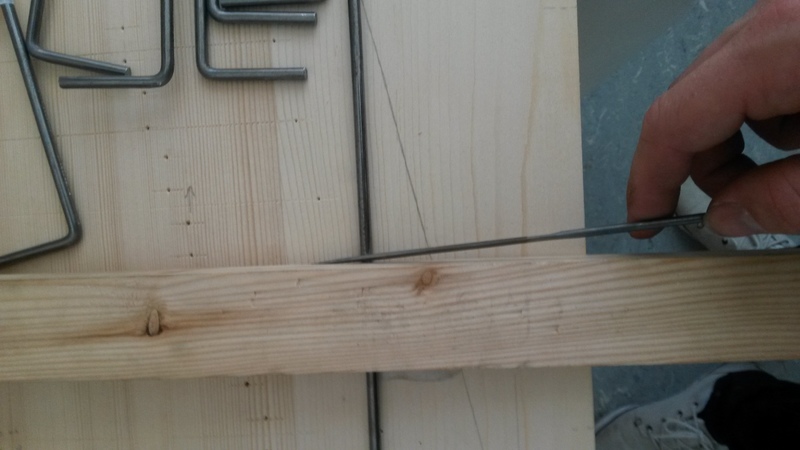
Preparing the metal rods. (Attribution) Photo: Deutsches Museum, M. Zahnweh CC BY-SA 4.0
To get the correct length for a rod, I would simply apply it directly to the wooden board and align it with the position of the corresponding key and valve. Then I would add a given length to it on each side by using a jig, in our case a piece of wood that was lying around in the workshop and mark the length with a small stain by filing into the rod.
Bending the rods. (Attribution) Photo: Deutsches Museum, M. Zahnweh CC BY-SA 4.0
It is very important that the measurement stays consistent throughout the process. After cutting the steel for the rod to length, the next step is to bend it to a 90° angle on each side. This is done by simply fixing the rod in a vice and hammering it cold.
Since the distance between the two angles has to stay true to the lines on the board, I had to find out by trial and error how much the bending-process takes away from the total length and then adjust for that by adding exactly that amount to the length of the aforementioned piece of wood. You can make it reproducible by using another jig, like a marking gauge.
After that I would file the rounded corners to be exactly 90° as well, to enable the rod to move freely within the metal rings it is attached to and not catch up with any uneven spots in the rod, which would cause noise and unwanted friction. The last step is to prepare small little rings out of brass-wire, which function as a very simple kind of bearing that allows the rods to move. The position for those little rings were determined by using a pricker to mark them while aligning each rod in their correct position relative to the placement of the key and the corresponding ventil. Subsequently a hole could be drilled and the rod is in its final condition.
Constructing the whole rollerboard with this method greatly enhanced my understanding of the inner workings of the organ as a whole (an instrument that I did not have extensive previous experience with), how its distinctive parts interact with each other and how the result will be determined by its building methods just as much as by the used materials. These two factors can really not be separated from one another, which is what I think Walter wanted me to understand by letting me work on part of the instrument “hands-on”.
Needless to say, these insights were also fuelled by watching Walter working on wooden pipes and the bellows, and asking countless questions about the building process and the physics involved in an organ pipe. I genuinely think that building with historic methods, if it's done in a scientifically informed manner, can greatly enhance our understanding of certain principles of construction and raise awareness of aspects we otherwise wouldn't necessarily think of being significant. For that matter it can be a powerful scientific method.
Citation: Leon Chisholm, ‘The organo di legno’s timbral timber’, in: Materiality of Musical Instruments. A Virtual Exhibition.